Install Symfony in a Docker environment
Docker has been a very usefull tool for me and my team, you know why? Every development environment is the same, and we can tune the development environment to be close or as the same as the production environment.
Install Docker
Depending on your OS Docker has different installation methods. You can visit Docker's website for installation instructions.
During the setup of Docker, make sure you assign enough RAM and CPU power to your containers, it will heavily impact performance.
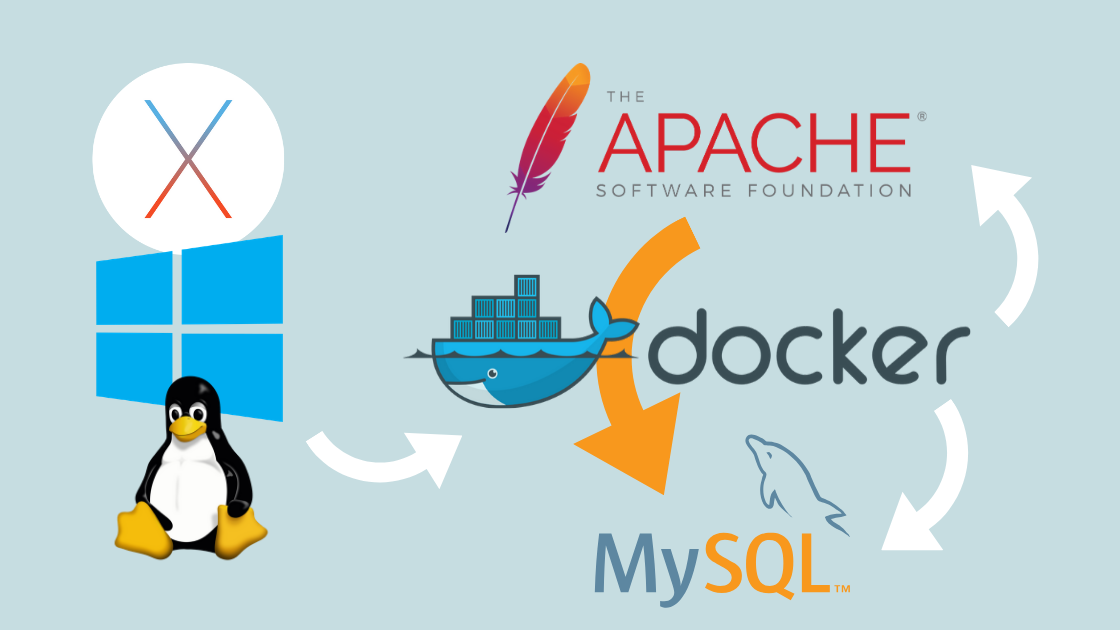
Visualisation of the architecture
As described in the infographic above, Docker is the bridge between your host system (Windows, MacOS or Linux) and your web services (Apache & MySQL server). In the Docker configuration, which is next you'll see we can forwards ports like you would on your router to access both the Apache and the MySQL server from your host machine.
The important part you need to understand is that the Apache server and MySQL server are two seperate containers, running on a single host machine.
The Docker setup
In this example I will use my already created Docker image, but you can use any Docker image that suits your needs. The data and documentation on my Docker image you can find by clicking the link.
We will use this image in our docker-compose.yml file, we can re-use this in all of our projects.
Initial docker.compose.yml
version: '3.1'
services:
  app:
    image: ciryk/dev:7.3-apache
    depends_on:
      - db
  db:
    image: mysql:5.6
    environment:
        MYSQL_DATABASE: sulu
        MYSQL_ROOT_PASSWORD: sulu
Here you can already spot the architecture we described in the infographic, two containers called app and db, each with their own specific image. The app container uses the custom image I provided you already, the database will use the mysql image, the version provided is now 5.6, but as you already might have figure out this can be changed to f.e. 5.7 or even MariaDB.
There are two requirements for your MySQL image, that is to set the database and root password being used, these credentials will be used when connecting your Symfony app with your MySQL docker container.
You can actually already start your docker containers using docker-compose up -d command in the root of your project, though this makes no sense at the moment as no ports are being forwarded to your containers.
 #...
  app:
    image: ciryk/dev:7.3-apache
    ports:
      - "80:80"
    volumes:
     - ./app:/var/www/html
  db:
    image: mysql:5.7
    ports:
      - "3306:3306"
    volumes:
      - my-db:/var/lib/mysql
    #...
volumes:
  my-db:
Execute docker-compose up -d again to restart your containers and forward the ports provided in your configuration.
Go and visit http://localhost, you should already see an Apache error showing up, this means the Apache server is working but there's not content available yet.
Same goes for the MySQL server, connect to the container with your preferred MySQL client with the configured credentials.
Let's explain the docker-compose.yml file:
- The ports are straightforward, when your visit port 80 on your host machine it will be forwarded to port 80 in your docker container, same for the db container
- The volume in the app will sync all files in your app folder with your Docker container
- The volume on the db container is a bit special, actually when using your db container without a volume attached to /var/lib/mysql your data will not be persistent, meaning on reboot of your container all data is lost, so this step is important. It's synced with an internal Docker volume, data inside this container only gets removed if the volume is removed specifically.
Install Symfony in your Docker environment
Now that your docker containers are started, go have a quick look at their status using docker ps. Both you app and db container should be running to proceed with the next steps.
> docker ps
CONTAINER ID        IMAGE                  COMMAND                  CREATED             STATUS              PORTS                               NAMES
ce23da88c47a        ciryk/dev:7.3-apache   "docker-php-entrypoi…"   20 seconds ago      Up 19 seconds       0.0.0.0:80->80/tcp                  symfony-docker_app_1
5bef09f1bf3e        mysql:5.7              "docker-entrypoint.s…"   20 seconds ago      Up 20 seconds       0.0.0.0:3306->3306/tcp, 33060/tcp   symfony-docker_db_1
As you can see, both of my containers are up and running, and the ports are forwarded correctly.
To now start adding code, bash inside your container with docker exec -it symfony-docker_app_1 bash, this should take your to /var/www/html inside your container. Let's clone Symfony inside that root directory.
git clone https://github.com/symfony/skeleton .Checkout to the latest release to be sure you're not working on an unstable installation:
git checkout v5.0.99Now look at the files on your host file, you will see the app folder being populated with the skeleton files. The next step is to install your PHP dependencies using composer, again inside your docker container execute the following:
composer installWant to see something cool? Visit http://localhost and see what shows up ;-) (You should see Symfony welcome page)
Connect your Symfony app with the DB container
So you now have:
- A working Symfony application inside an apache container
- A running database container
Let's combine the two!
Inside your app container, install doctrine:
composer req ormThis command will install all ORM tools for your Symfony application, now add a .env.local to the root of your app folder with the following contents:
APP_ENV=dev
DATABASE_URL=mysql://root:symfony@db:3306/symfony?serverVersion=5.7
Let's explain this DATABASE_URL, i usually copy it from .env file and change it up, it originally looks like this: DATABASE_URL=mysql://db_user:[email protected]:3306/db_name?serverVersion=5.7.
All the details that need to be filled in here is already defined in our docker-compose.yml file. Go have a look, we have MYSQL_ROOT_PASSWORD, MYSQL_DATABASE, the hostname is a Docker special. Docker uses internal networking so you can actually access your database by using the container name, which is "db".
Let's test this by creating a Entity and creating the database structure straight from the Symfony app.
Create a new file Event.php inside src/Entity:
<?php

namespace App\Entity;

use Doctrine\ORM\Mapping as ORM;

/**
 * @ORM\Entity
 * @ORM\Table(name="event")
 */
class Event
{
    /**
     * @ORM\Id
     * @ORM\GeneratedValue(strategy="AUTO")
     * @ORM\Column(type="integer")
     */
    private $id;

    /**
     * @ORM\Column(type="datetime")
     */
    private $date;

    /**
     * @ORM\Column(type="string")
     */
    private $title;

    public function getId()
    {
        return $this->id;
    }

    public function getDate()
    {
        return $this->date;
    }

    public function setDate($date): void
    {
        $this->date = $date;
    }

    public function getTitle()
    {
        return $this->title;
    }

    public function setTitle($title): void
    {
        $this->title = $title;
    }
}
This should suffice, now update your database with this new entity!
php bin/console doctrine:schema:update -froot@ce23da88c47a:/var/www/html# php bin/console doctrine:schema:update -f
Updating database schema...
1 query was executed
[OK] Database schema updated successfully!Now have a look at your database with your favourite database tool, neat huh?!
Conclusion
So what did we do here?
- Setup of docker-compose.yml file
- Installation of Symfony application
- Connect Symfony application to the MySQL Docker container
You can now start developing your application, to stop your containers your can use docker-compose down, to restart them use docker-compose up -d.
Have any questions regarding Docker in development? Feel free to comment below and I will try to help you out!